15 Under-Sink Organization Tips for Pipes That Block Storage
This site contains affiliate links, view the disclosure for more information.
Under-sink organization becomes challenging when plumbing pipes divide the cabinet into awkward spaces. Most cabinets contain a vertical drainpipe, a horizontal P-trap, and water supply lines that limit where bins and shelves can fit. These tips focus on working around fixed pipes rather than relocating them.
Standard under-sink cabinets measure 24 to 36 inches wide and 16 to 24 inches deep. The plumbing typically runs through the center or rear, leaving two narrow side zones and shallow front space. Effective under-sink organization uses adjustable tools, stackable containers, and mounting systems that adapt to existing pipe layouts.
Most methods require no tools beyond a measuring tape and adhesive hooks. Some solutions involve tension rods or sliding drawers that need basic assembly.
Measure Pipe Clearance Before Buying Organizers
Measure the width between the drainpipe and cabinet wall on both sides. Note the horizontal distance from the back wall to the P-trap’s lowest point. Record the vertical height from the cabinet floor to the underside of the sink basin.
Write down these three measurements before shopping. Most expandable organizers list their minimum and maximum widths. Compare your measurements to product specs to avoid returns.
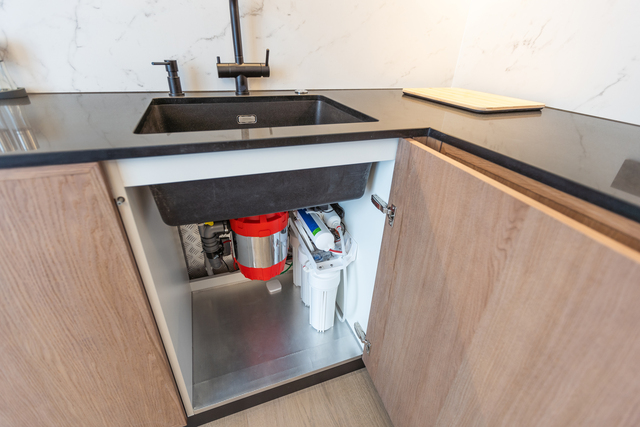
Check for garbage disposal units or water filtration systems. These add bulk and reduce usable space on one side.
Use Adjustable Shelf Risers That Fit Around Pipes
Shelf risers create two storage levels in the same footprint. Choose models with a cutout notch or open back panel that accommodates vertical pipes. Metal wire risers often provide more clearance than solid plastic versions.
Position the riser on one side of the drainpipe where the cabinet is widest. Place shorter items like sponges or scrub brushes on the top tier. Store taller bottles on the cabinet floor beneath or beside the riser.
Avoid risers taller than 10 inches unless your cabinet has extra vertical clearance. Measure from the floor to the sink basin’s lowest point before selecting height.
Install Tension Rods for Hanging Spray Bottles
Mount a spring-loaded tension rod horizontally across the cabinet width, positioned in front of or behind the drainpipe. Hang spray bottle triggers over the rod so bottles dangle vertically. This method works best in cabinets at least 18 inches wide.
Install the rod 8 to 12 inches above the cabinet floor. Higher placement may interfere with the sink basin or disposal unit. Test the rod’s grip by pulling downward with moderate force.
Limit the number of bottles to four or five per rod to prevent sagging. Heavier bottles may cause tension rods to slip over time.
Choose Stackable Bins With Open Fronts
Open-front bins allow access without removing the entire container. Stack two or three bins vertically on the side of the cabinet farthest from the pipes. Each bin should measure no more than half the cabinet’s width.
Label bins by category: cleaning supplies, dish soap refills, trash bags. Place the most frequently used items in the top bin. Store backup supplies or seasonal items in lower bins.
Avoid bins taller than 6 inches each. Taller units reduce visibility and make the bottom bin difficult to reach.
Mount an Over-the-Cabinet-Door Organizer
Door-mounted racks hang over the top edge of the cabinet door without drilling. Choose racks with shallow pockets sized for sponges, gloves, or small bottles. Most models fit doors between 0.5 and 0.75 inches thick.
Position the organizer so pockets do not interfere with door closure. Test the door’s swing clearance after installation. Remove the organizer if it prevents the door from latching fully.
Do not overload door organizers beyond the manufacturer’s weight limit, typically 3 to 5 pounds total. Excess weight can damage door hinges or cause the organizer to slip.
Use Turning Trays in Corner Under-Sink Cabinets
Corner cabinets with pipes near the back create dead space on the sides. A turning tray placed in front of the pipes makes items accessible with a spin. Choose models between 10 and 12 inches in diameter for standard cabinets.
Group similar items on the turntable: dish soap, hand soap refills, surface cleaners. Keep the heaviest bottles near the center to maintain balance. Avoid placing items taller than 10 inches that may tip during rotation.
Clean the turntable base monthly to remove drips and sticky residue. Buildup can slow rotation or cause items to stick.
Install Slide-Out Drawers on Cabinet Floor Tracks
Under-sink organization improves with sliding drawers that pull forward for full access. These units mount on tracks installed along the cabinet floor. Most models require a screwdriver and 15 to 30 minutes for assembly.
Measure the cabinet’s interior width and depth, accounting for pipe placement. Choose drawers narrow enough to fit beside the drainpipe or P-trap. Single-tier drawers work best in cabinets with limited vertical clearance.
Sliding mechanisms add 1 to 2 inches to the drawer’s depth. Confirm the drawer can extend fully without hitting the cabinet’s front edge. Test the slide before loading items.
Attach Adhesive Hooks for Dish Gloves and Brushes
Adhesive hooks mount inside the cabinet door or side wall without drilling. Use small hooks for dish gloves, medium hooks for scrub brushes with loops. Clean the mounting surface with rubbing alcohol before applying the adhesive backing.
Press the hook firmly against the surface for 30 seconds. Wait 24 hours before hanging items to allow the adhesive to cure. Most command hooks hold up to 1 pound.
Avoid placing hooks near heat sources like hot water pipes. High temperatures can weaken adhesive bonds and cause hooks to detach.
Related Post: 6 Fixes for Cabinets With Hard to Reach Corner Space
Store Tall Bottles in a Narrow Pull-Out Caddy
Pull-out caddies are slim vertical organizers that slide on floor-mounted tracks. They fit in the narrow space between the drainpipe and cabinet wall, typically 4 to 6 inches wide. This design works well for tall bottles that do not fit under shelf risers.
Install the caddy on the side with the most clearance. Load bottles with the heaviest at the bottom for stability. Pull the caddy forward to access items rather than reaching around pipes.
Check that the caddy’s handle does not interfere with door closure. Some models include a recessed handle to save space.
Use Magnetic Strips for Small Metal Items
Stick a magnetic strip to the inside of the cabinet door or side wall. Attach small metal tools like scissors, bottle openers, or scrubbing pads with metal backing. This keeps frequently used items visible and off the cabinet floor.
Choose adhesive-backed magnetic strips rather than screw-mounted versions for easier installation. Cut the strip to fit the available wall space using household scissors. Clean the mounting surface before applying the strip.
Test the magnet’s hold with your items before permanent placement. Weak magnets may not support heavier tools.
Group Items in Clear Bins for Quick Scanning
Clear plastic bins make contents visible without opening lids. Use small bins (6 to 8 inches wide) for categories like sponges, dishwasher pods, or garbage bag rolls. Place bins on one side of the cabinet, leaving the other side open for taller items.
Label each bin on the front-facing edge. Store bins you access daily at eye level or on the cabinet floor’s front half. Push less-used bins toward the back or sides.
Avoid bins with lids that open upward in cabinets with low clearance. Side-latching lids work better in tight spaces.
Install a Tension Rod Curtain to Hide Clutter
Mount a tension rod across the cabinet’s width, just behind the door opening. Hang a fabric panel or plastic curtain from the rod using clip rings. This hides disorganized items while maintaining access.
Choose a lightweight fabric or vinyl material that does not obstruct door closure. Cut the panel to hang 1 inch above the cabinet floor to prevent dragging. A neutral color or pattern that matches your kitchen works best.
This method does not improve actual under-sink organization but reduces visual clutter when the cabinet door is open.
Also Read: 7 Fixes for Kitchen Drawers That Overfill Too Easily
Keep Frequently Used Items in Front Zones
Place daily-use items like dish soap, sponges, and all-purpose cleaner in the cabinet’s front third. Position them directly in front of the drainpipe where they are easy to grab without reaching around plumbing.
Reserve the back corners and sides for backup supplies, seasonal items, or tools used less than once per week. This reduces the need to move items to access what you need.
Adjust front-zone contents every few months as usage patterns change. Rotate seasonal items like drain de-cloggers or garbage disposal cleaners to the front during their peak use period.
Use Expandable Shelves That Adjust to Pipe Width
Expandable shelves telescope to fit cabinet widths between 12 and 24 inches. Models with adjustable legs or notched edges work around vertical pipes. Place the shelf on one side of the drainpipe to create a second storage tier.
Set the shelf height based on the items you plan to store underneath. Leave 4 to 6 inches of clearance for bottles or bins below. Adjust the width so the shelf does not press against the drainpipe or cabinet walls.
Check stability by pressing down on the shelf’s center. Shelves that wobble may need leg adjustment or a non-slip mat underneath.
Read More:
- How to Organize Kitchen Wooden Spoons and Spatulas
- How to Organize Kitchen Cabinets in Small Spaces
- How to Organize Kitchen Utensils in a Messy Drawer
Avoid Overcrowding the Cabinet to Maintain Pipe Access
Leave at least 6 inches of open space around the P-trap and shut-off valves. Plumbers need access to these areas during repairs or inspections. Overcrowding can also make slow leaks difficult to detect until water damage occurs.
Inspect under-sink organization every three to six months. Look for signs of moisture, mold, or product leaks. Remove any items blocking your view of pipe connections or the cabinet floor.
Do not store heavy items that could stress or shift pipes if they tip over. Keep containers under 5 pounds in areas near plumbing connections.
Store Cleaning Products Away From Food Items
If you store trash bags, foil, or other food-related items under the sink, separate them from cleaning chemicals. Use one side of the cabinet for cleaning supplies and the opposite side for non-toxic items. A physical divider like a tension rod or vertical bin can reinforce this separation.
Keep products in their original containers with labels visible. This prevents accidental misuse and helps identify expired items. Check expiration dates twice per year and dispose of old products according to local hazardous waste guidelines.
This separation reduces the risk of accidental contamination and improves safety when multiple household members access the cabinet.

For more helpful tips, check out our organization section.